Dynasign Player Production Setup
I. Hardware Minimum Requirement
- Processor: Intel Dual-Core processor
- RAM: 4Gb or above
- Hard drive: 40Gb or above
- Network interface: network card or wireless adapter
- Graphics: Support at least 1024x768 resolution with 32bit color
- OS: Windows 10 or Windows 7
- Display: any PC compatible displays (LCD, Plasma, or Projections)
- Internet Connection: broadband Internet connection is required to register Dynasign Player and receive content.
II. Player Hardware Preparation
(This section is optional for non production installation)1. PC BIOS Setup (Phoenix example)
- Standard CMOS: set Halt On to "No Errors".
- Power Management: set AC Power Recovery to "On".
- Power Management: enable "Wake On RTC Timer" and set the time for daily auto start if necessary.
2. Window OS Setup
- Fresh install Windows OS.
- Make sure the Regional and Language Options is correct.
- Select the correct timezone, date and time setting.
- Update Windows to the latest service release
3. Turn off Windows Security Alert Messages
For Windows 7:
- Go to Start->Control Panel->System and Security->Action Center->Change Action Center Settings
- Click on Problem Reporting Settings under Related Settings->Change report settings for all users, select Never check for solutions box, then click on OK.
- From "Turn messages on or off" screen, uncheck all boxes, click on OK.
- Click on Change User Account Control settings, set to Never notify, then click OK
- Right click Windows icon to go to Control panel->System and Security->Security and Maintenance, in the left pane click on ‘Change Security and Maintenance settings’, uncheck all the boxes that are allowed to uncheck., click on OK.
- In the left pane, click on ‘Change User Account Control settings’, set the dial to Never notify, then click OK
4. Disable Windows Screensaver and All Power management features in Windows
For Windows 7:
- Right click on desktop select Personalize->Screen Saver icon, choose None under Screen Saver selection field
- Click on Change power setting text link->click on Change plan settings of current select plan, Select Never for Turn off the display and Put the computer to sleep, then click on Save changes.
- Click on Change advanced power settings->USB Settings->USB selective suspend setting, select disabled, click on OK.
- Right click on desktop select Personalize->Lock screen->Screen saver settings, choose None under Screen Saver selection field.
- Click on Change power setting text link->click on Change plan settings of current select plan, Select Never for Turn off the display and Put the computer to sleep, then click on Save changes.
- Click on Change advanced power settings->USB Settings->USB selective suspend setting, select disabled, click on OK.
5. Taskbar Setting and Notification Area Setting
For Windows 7:
- Right click on taskbar->Properties
- Check Auto-hide the taskbar
- Click on Customize... button.
- Select Hide icon and notifications under Behaviors column for all Icons except for Dynasign Watcher, Volume and Clock, which need to be set to Display icon and notifications
- Click on Turn system icons on or off text link. Select Off under Behavior for Action Center, Network and Power. Then click OK at lower right.
- Click on clock at lower right system tray, click on Change date and time settings..., Uncheck "Notify me when clock changes" settings.
- Right click on taskbar->Settings, turn on 'Automatically hide the taskbar in desktop mode'
- Click on ‘Turn systems icons on or off’ link, keep Clock and Volume icons On, the rest off
6. Internet Explorer Browsing History Setting
- Open Internet Explorer
- Go to Internet Options->General->Browsing History->Setting
- Select "Everytime I visit the webpage".
- Enter 0 for "Days to keep page in history".
7. Bypass Windows User Logon Screen
- Create a user account with administrative privileges or select an existing user name with administrative privileges for logon.
- Click on Start. Type 'netplwiz' in the search box and enter.
- Uncheck the box next to "Users must enter a user name and password to use this computer."
- Select the user name from the users list and then click Apply button to bring up next window.
- Enter user name and password, then OK.
8. Internet Explorer Setup
The WebBrowser control in .Net framework uses the IE installed on the PC, but by default it always simulates IE7. To fix this, you need to add a Windows registry value.
- Start Regedit.exe
- For 32-bit Windows, locate [(HKEY_LOCAL_MACHINE)\Software\Microsoft\Internet Explorer\Main\FeatureControl\FEATURE_BROWSER_EMULATION] or
- For 64-bit Windows, locate [(HKEY_LOCAL_MACHINE)\Software\Wow6432Node\Microsoft\Internet Explorer\Main\FeatureControl\FEATURE_BROWSER_EMULATION]
- Add a new "DWORD Value" and name it "DynasignPlayer.exe" to the above key. Change the "Value Data" depending on the version of IE installed on the player.
- For IE8, "DynasignPlayer.exe" = dword 8888 (Hex: 22B8) or
- For IE9, "DynasignPlayer.exe" = dword 9999 (Hex: 270F) or
- For IE10, "DynasignPlayer.exe" = dword 10001 (Hex: 2711) or
- For IE11, "DynasignPlayer.exe" = dword 11001 (Hex: 2AF9)
- This value will force Webbrowser control to use the newer IE mode instead of simulating the old IE7. IE11 is required to run HTML5 content properly.
-
To display webpage using TLS 1.2, add DWORD in registry as following:
- For 32-bit operating system: [HKEY_LOCAL_MACHINE\SOFTWARE\Microsoft\.NETFramework\v2.0.50727] "SystemDefaultTlsVersions"=dword, value 1
- For 64-bit operating system: [HKEY_LOCAL_MACHINE\SOFTWARE\Wow6432Node\Microsoft\.NETFramework\v2.0.50727] "SystemDefaultTlsVersions"=dword, value 1
- If you have old Windows 7 OS, need to further add two DWORDs at below location [HKEY_LOCAL_MACHINE\SYSTEM\CurrentControlSet\Control\SecurityProviders\SCHANNEL\Protocols\TLS 1.2\Client] "DisabledByDefault"=dword, value 0 "Enabled"=dword, value 1
- You may not see 'TLS 1.2' under Protocols, need to add this new Key, then add 'Client' new key under 'TLS 1.2'. Finally add two DWORDs above in 'Client'
9. High DPI Monitor Setup
-
When windows 10 detects certain high resolution monitor is connected, it will zoom in the desktop automatically and cause Dynasign player contents appear to be cut off. To correct this problem, please use one of the two methods listed below to override the high DPI scaling. To quit Dynasign player, presse CTRL+F1.
- Method 1. Add a String value in Windows registry: HKEY_LOCAL_MACHINE \Software\Microsoft\Windows NT\CurrentVersion\AppCompatFlags\Layers. If you don't see \Layers, add this Key first, then add String Value 'c:\Dynasign\Dynasignplayer3\Dynasignplayer.exe', the Value data for the string is '~ HIGHDPIAWARE', please note there is a space after ~.
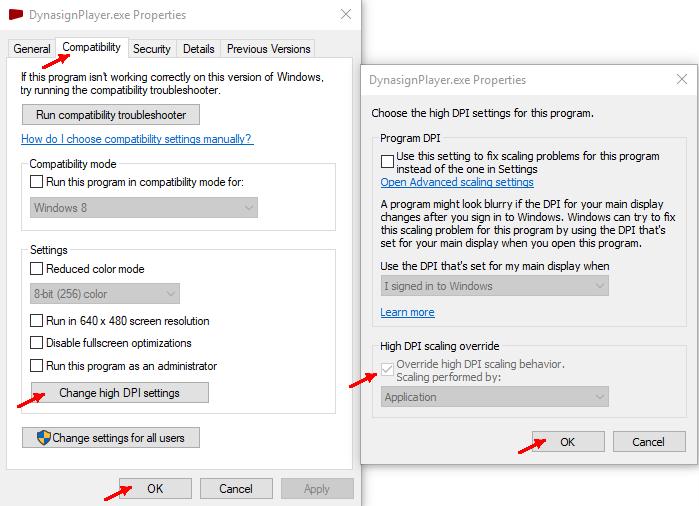
- Method 2. Set Dynasignplayer.exe to override high DPI scaling directly.
- Use file explorer to go to c:\dynasign\dynasignplayer3\
- Locate the file named dynasignplayer.exe, right click on the file name -> Properties.
- On the Properties window, click on Compatibility tab, look for a button called "Change high DPI settings",
- Click on that and look for the check box for "override high DPI scaling behavior", check that box.
- Click on OK, and OK
III. Software Installation Steps
Make sure your computer is connected to the Internet during the entire installation process.1. Install required third-party software and plug-ins
- Flash Player (20.0.0.228) (for Windows 7 only)
- Disable Flash Player Auto Updates: go to Windows Control Panel->System and Security->Flash Player->Updates tab, select radio button for 'Never check for updates'
2. Install Dynasign Player
- Remove any previous Dynasign Player software from Control Panel->Add/Remove Software
- Download and install the Dynasign Player -> DynasignPlayer3
- Reboot your player system to launch Dynasign
3. Register and Start Dynasign Player
- Dynasign Player will start automatically after system reboot.
- Take a note of the player license key from the email you received after signup.
- Enter your player license key in the popup window. Each player key can only be used on one computer.
- Click on "Resume" button to register and start Dynasign Player.
4. Exit from Dynasign Player
- To exit from Dynasign Player, enter Clt+F1 on your keyboard
IV. Optional Setup
Setup Dynasign Player for Playing PowerPoint Slideshow Files- Remove MS PowerPoint application installation from your PC if you already have PowerPoint installed.
- Download and install PowerPoint Viewer97.
- Setup your PowerPoint file to advance automatically under "Slide Transition" in MS PowerPoint application.